Why a Rosemary Hedge Is Your Garden’s Next Big Win and How to Grow It Like a Pro
It started, as so many of my best garden ideas do, with a mistake. I was trying to hide an ugly patch of chicken wire fencing without spending a fortune. I thought of lavender first, but the spot was too dry, and I didn’t want to baby it through summer. Then, during a trip to a local nursery—one of those slow Saturday mornings when I wasn’t looking for anything—I brushed past a rosemary shrub, and the scent stopped me in my tracks.
Piney, lemony, earthy. It reminded me of my grandmother’s kitchen and summer evenings grilling outside. That scent has always made me feel at home. The tag read: “Drought-tolerant, evergreen, edible.” I grabbed three on impulse.
What started as a quick fix has now become one of my favorite features in the garden—a living, fragrant fence that I never knew I needed. It didn’t just work, it thrived. And it made me rethink the role of herbs in garden design altogether.
Why I Love My Rosemary Hedge (and You Might, Too)
A Fence That Blooms and Feeds You
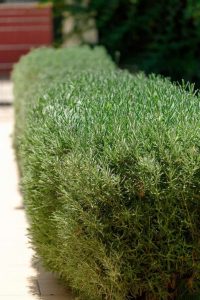
I planted my first rosemary hedge along a winding path that leads to the potting shed. It now marks the border between garden beds and lawn—a tidy 2-foot-tall green ribbon. When I brush against it, that familiar scent fills the air. I can’t walk past without running my hand through it.
But here’s the real magic: this hedge works harder than most garden features. It softens edges, feeds the bees with tiny blue blossoms in spring, and flavors my roasted potatoes without needing a trip to the grocery store.
Rosemary hedges are:
-
Evergreen and beautifully textured
-
Wonderfully fragrant (especially after rain or sun)
-
Dense enough to define borders without blocking views
-
Useful year-round for culinary and herbal use
Stronger Than It Looks (and Easier Than It Sounds)
This might be one of the most forgiving plants in my garden. It thrives where many things don’t—sunny, dry, rocky, poor soil? Rosemary just shrugs and grows. Once established, it barely needs a thing.
I’ve skipped weeks of watering during hot stretches, and the hedge stayed green and happy. No fertilizing marathons. No pest issues. It’s like a silent gardener doing its job in the background.
I’ve even clipped sprigs during winter snow flurries. It’s that tough.
In my experience:
-
Once established, it needs water only during extended dry spells
-
No heavy feeding required—rosemary prefers lean soil
-
Light trimming once or twice a year is enough to keep it neat
A Living Pantry at Your Fingertips
I can’t tell you how many times I’ve been halfway through cooking and realized I needed rosemary. No problem—I grab scissors, slip on my garden clogs, and snip a fresh sprig. The flavor is brighter, more intense than anything from the store. It’s especially good with roasted vegetables, grilled meats, infused oils, or homemade focaccia.
Even better? It feels like a ritual. A connection between garden and kitchen that’s practical and personal.
Bonus tip: Let a few blooms flower in spring—they’re tiny, but pollinators love them.

Four Seasons of Structure and Beauty
When the rest of the garden fades in winter, rosemary stays strong—green, firm, full of shape. In my Zone 7b garden, it handles light snow and frost without blinking. It gives structure to the borders and keeps the whole yard from looking too bare.
It’s not flashy, but it’s always there. Dependable and quietly elegant.
If I had to pick just one plant to line a path or dress up a bed, rosemary would be at the top of the list.

Built-In Bug Defense
I didn’t plant rosemary to repel pests—but I noticed something after the hedge matured: fewer aphids on the nearby roses, fewer mosquitoes buzzing around the seating area. I’ve even crushed a few leaves and rubbed them on my arms before working in the garden in summer—it works surprisingly well.
Rosemary’s natural oils are known to deter many insects, and I’ve noticed the difference. It’s like a soft, fragrant force field.
The Easy Way to Grow Your Own Rosemary Hedge
Step 1: Find the Sunniest Spot You’ve Got
Rosemary is a sun lover—6 hours a day, minimum. I placed mine along a south-facing path that bakes in summer, and it absolutely thrives.
If you’ve got heavy soil, amend it or build it up. Rosemary hates soggy roots more than anything.
Tip from a past mistake: The first rosemary I ever planted died within weeks because the soil didn’t drain. Now I mix in gravel or sand if things are too compact.
Step 2: Skip the Seeds—Go Straight for Young Plants
Seeds are fussy and slow. I’ve learned that starting with healthy 4–6 inch nursery plants or cuttings is the way to go. You’ll get faster results and a more even hedge.
My go-to varieties:
-
‘Tuscan Blue’ – tall and stately
-
‘Miss Jessopp’s Upright’ – strong, elegant, fast-growing
-
‘Prostratus’ – low and trailing, for softer edges
-
‘Arp’ – cold-hardy and a solid choice for zones below 7
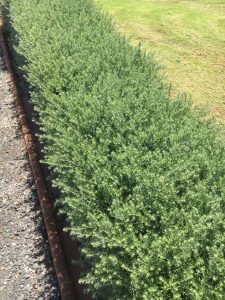
I space mine about 18–24 inches apart, depending on the variety. A simple garden stake and string line help me plant in a neat row.
Step 3: Plant With a Light Touch
No compost, no rich amendments. Rosemary likes things lean. I dig just deep enough to settle the root ball, backfill with native soil, and give it a generous watering.
Early care tips:
-
Water every few days for the first month
-
Once roots are set, cut back watering
-
Mulch lightly, but don’t let it sit against the stems
Step 4: Shape It, But Don’t Rush It
Resist the urge to trim too early. I let mine grow wild for a year before I started shaping it. When it’s time, I prune just after flowering in spring, cutting back by a third. I avoid cutting into old wood—rosemary doesn’t regrow well from hard cuts.
You can go classic and boxy or soft and billowy. I like mine with a slight curve—like it’s swaying, even when it’s not.

Step 5: Let It Thrive, Then Step Back
Once it’s established, this hedge practically takes care of itself. I water it during long dry spells and trim lightly once or twice a year. That’s it.
If you live in a colder climate (Zone 6 or below), mulch the roots well in winter or grow rosemary in pots that can come inside. I’ve even seen gardeners shape small rosemary hedges in raised beds and containers.
Final Thoughts: A Hedge That Earns Its Place
Rosemary wasn’t a plant I planned to love. It just quietly showed up and won me over. Now, years later, I can’t imagine my garden without it. It’s one of those plants that never asks for attention—but gives you so much when you finally look closely.
Fragrance. Flavor. Structure. And a little moment of calm every time you walk by.
If you’ve tried growing rosemary—or you’re thinking about it—drop a comment and tell me where yours is planted, or what you’re cooking with it next. Let’s keep growing beautiful things, one fragrant sprig at a time.


