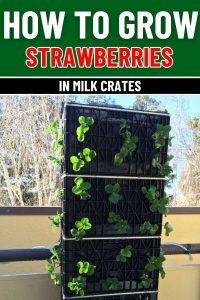
How to Grow Strawberries in Milk Crates for an Abundant Harvest
My kids have always had a thing for strawberries—those first-of-summer bites that drip down their chins and disappear far too fast. Every trip to the farmers’ market ends the same way: with a paper basket of sun-warmed berries and sticky fingers before we’ve even left the parking lot.
Last year, after seeing how quickly they devoured yet another pint, I asked them what they thought about growing our own. Their faces lit up like it was the best idea I’d ever had. We didn’t have raised beds or a sprawling backyard, just a few weathered milk crates tucked behind the shed and a sunny spot near the porch.
We lined the crates, scooped in handfuls of soil, and planted a few starter strawberries with careful hands and big hopes. The crates sat quietly in the sun, and day by day, tiny changes brought big excitement—little green buds, then white blossoms, then finally, the reddest, sweetest strawberries we’d ever tasted.
That crate garden became more than just a project. It was a lesson in patience, in delight, in the magic of growing your own. And now, every spring, it’s become our tradition to start again—one crate, one plant, one berry-filled moment at a time.
Why Grow Strawberries in Milk Crates?
Milk crates may not seem like gardening tools at first glance, but they’ve become one of my favorite container hacks. Here’s why they’re perfect for growing strawberries:
-
Excellent Drainage – Crates allow water to escape easily, preventing soggy roots.
-
Airy Roots – The open structure offers excellent oxygen flow to root systems, which strawberries love.
-
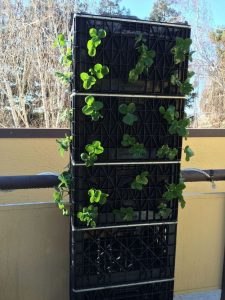
Space-Saving – You can stack or arrange crates vertically or side by side—even in tight spots.
-
Portable – Move them to chase the sun, shelter them from frost, or bring them indoors during storms.
Plus, they have character. I’ve used everything from bright red plastic crates to vintage wooden ones from a friend’s shed.
What You’ll Need
- Milk crate (1 per strawberry plant, or 3-5 plants per large crate)
- Landscape fabric or burlap
- High-quality potting mix
- Strawberry plants
- Organic fertilizer
- Mulch (straw, shredded leaves, or wood chips to retain moisture)
Tip: If you’re using a used crate, give it a good rinse and check for sharp edges.
Step-by-Step Guide to Growing Strawberries in Milk Crates
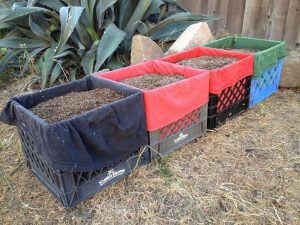
1. Prepare the Milk Crate
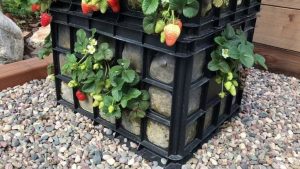
Milk crates have big gaps—great for airflow, not so great for holding soil.
- Cut a piece of fabric or burlap large enough to cover the bottom and sides.
- Press it inside snugly like you’re lining a drawer.
- Secure with clips or clothespins if it slips.
This liner keeps soil in place while still letting water drain.
2. Fill with the Right Soil
Strawberries love well-draining, nutrient-rich soil. I use a mix of:
- 60% high-quality potting mix
- 30% compost or aged manure
- 10% perlite or sand (for extra drainage)
Gently press the soil down as you fill the crate, but don’t compact it too much, strawberries prefer loose, airy soil.
3. Plant Your Strawberries
Strawberries need space to spread their roots and runners.
-
In a large crate, plant 3–5 strawberries about 6–8 inches apart.
-
Make a small hole, nestle the roots in, and gently cover with soil.
-
Keep the crown (where the leaves meet the roots) just above the soil line.
When I first did this, I overpacked my soil and buried the crowns too deep—lesson learned. Keep it light and level.
4. Light and Water: Getting It Right
Strawberries are sun-lovers. They need at least six hours of direct sunlight each day, and even more if you want full, juicy fruit. I place the crates in the sunniest part of the patio and shift them throughout the season to follow the light.
During heatwaves, the crates can dry out quickly, so I check the soil daily by pressing a finger an inch below the surface. If it feels dry, it’s time to water.
Rather than a quick splash, I always go for a deep watering, letting the moisture soak in and reach the roots. Container plants dry out faster than garden beds, so it’s something I pay close attention to—especially once fruit starts to set.
5. Feeding and Encouraging Fruit
Fertilizer helps your strawberries thrive, but too much nitrogen will give you lush leaves and no berries.
-
Use organic options like seaweed extract, compost tea, or a strawberry-specific fertilizer.
-
Feed every 2–3 weeks once growth starts.
-
Avoid high-nitrogen blends—stick to phosphorus and potassium-rich formulas.
Sometimes I steep my own banana peel tea (soaked peels in water for a day or two) and use it as a gentle boost.
7. Mulch for Moisture Retention
A thin layer of mulch goes a long way. I’ve used straw, shredded leaves, and even pine needles to cover the surface of the crate soil. Mulching helps lock in moisture, keep weeds at bay, and protect the berries from touching bare soil, which can lead to rot or disease. It also keeps the crate looking tidy and helps maintain an even temperature during spring’s unpredictable weather.
I try to leave a small ring of space around the base of each plant to prevent rot from trapped moisture at the crown. A simple step that makes a world of difference, especially in humid areas.
8. Prune & Manage Runners
Strawberry plants love to send out runners—those long, creeping stems that try to set down roots and start new plants. Depending on your goal, you can let them go wild or trim them back.
When I want larger berries and a neater crate, I prune most runners as they appear. But if I’m in the mood to expand my patch, I’ll let a few take root in nearby containers, creating new plants from the mother.
How to Maintain Your Milk Crate Strawberry Garden
Pest Prevention
- Keep an eye out for slugs, aphids, and birds, they love strawberries as much as we do!
- Cover your crates with netting if birds become a problem.
- Sprinkle diatomaceous earth around the edges to deter slugs.
Winter Care
- If you live in a mild climate, strawberries will stay green year-round.
- In colder zones, move the crates to a protected area, like a garage or covered porch, to prevent freezing.
- Add an extra layer of mulch for insulation.
Harvesting Your Strawberries
There’s nothing like that first ripe strawberry. It usually appears about a month after flowering, and I wait until the berry is deep red all over before picking. I always harvest in the morning when the fruit is cool and firm. Instead of tugging, I gently twist the berry free to avoid damaging the plant.
And yes—sometimes I still eat them right there on the patio, before anyone else sees. Some moments are meant to be savored in the garden, in the sun, in silence.