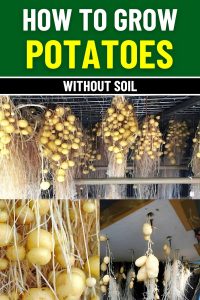
You Can Harvest Tons of Potatoes Thanks to This Method
I’ll never forget the look on my neighbor’s face when I told her I was growing potatoes without a single scoop of soil. She blinked twice and said, “You mean in water?” I smiled, shook my head, and waved her over to the little greenhouse tucked behind my shed.
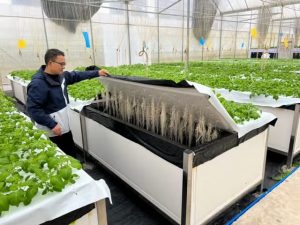
Inside, a soft hum filled the space, and a mist hovered gently around clusters of green vines. From above, the potato plants looked ordinary enough. But just below, suspended in open air, their roots dangled freely—drinking in bursts of nutrient mist, thriving with zero dirt in sight.
That was my first venture into aeroponics, and let me tell you: it changed how I think about gardening.
I’ve grown potatoes in buckets, beds, bags—you name it. But this? This method was cleaner, faster, and felt like something out of a garden sci-fi film. And the best part? The harvest was incredible. Let’s dive into how you can bring this futuristic growing method right into your home.
What Is Aeroponics, and Why Should You Try It?
Imagine your plants floating in air, their roots kissed by a gentle mist filled with nutrients. That’s aeroponics. Unlike hydroponics, which submerges roots in water, aeroponics keeps them suspended—allowing maximum oxygen exposure and incredibly efficient nutrient delivery.
For potatoes, which love consistent moisture but hate being waterlogged, this setup is a dream come true. Plus:
- No soil means fewer pests and diseases.
- No digging, bending, or muddy hands come harvest time.
- It works indoors, on patios, or in small urban spaces.
- Growth is faster, and yields? Oh, you’ll be smiling come harvest day.
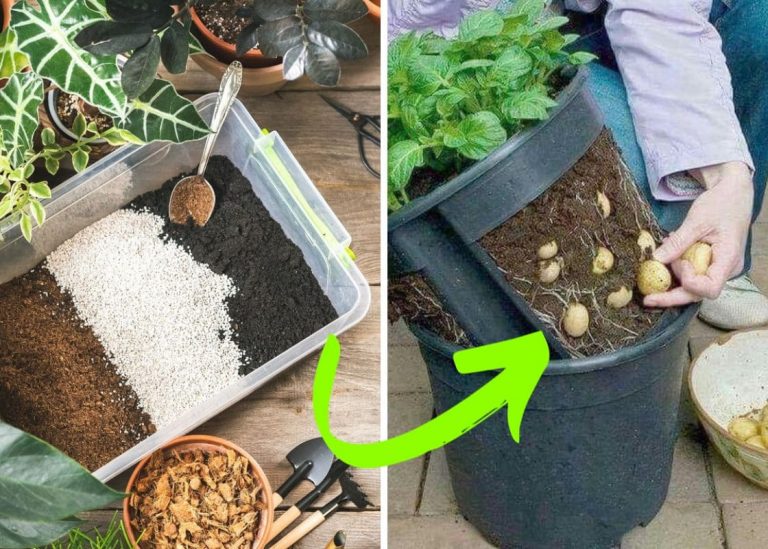
Materials You’ll Need
To set up an aeroponic system for potatoes, you’ll need the following:
- Aeroponic system: Look for a system with misting nozzles or a fogger to deliver a fine mist to the roots.
- Seed potatoes: Use disease-free, certified seed potatoes. Cut them into pieces, ensuring each piece has at least one eye.
- Nutrient solution: Opt for a balanced formula designed for root vegetables, containing essential nutrients like nitrogen, phosphorus, and potassium.
- pH testing kit: Maintain the solution’s pH between 5.8 and 6.2.
- Light Source: If growing indoors, use LED or fluorescent grow lights to provide at least 6–8 hours of light daily.
- Temperature and humidity control: Ideal temperature ranges between 60–75°F (15–24°C), with consistent humidity levels.
Step-by-Step Guide to Growing Potatoes with Aeroponics
1. Prepping the Potatoes
I once skipped the drying step—big mistake. The cut pieces rotted like wet sponges. Now, I let my potato chunks air-dry for 24 to 48 hours. That forms a protective callous over the cuts and keeps them from turning mushy.
Just pick healthy seed potatoes, cut them into chunks, and leave them in a cool, shaded place until they toughen up.

2. Getting the System Ready
This part always feels like setting up a tiny science lab. Make sure:
- Misting nozzles are clean and evenly spaced.
- The spray is fine and reaches all root zones.
- Your grow lights are positioned about a foot above where the plants will grow.
- You do a full test run—no surprises later.
The first time I skipped the test, the back row of plants didn’t get misted. I didn’t find out until their leaves turned crispy.
3. Inserting the Seed Pieces
Place each chunk into a net pot, with the eye facing up. You want the bottom half in the misting zone, so the roots get all the nutrients they need.
Don’t cram them. Give them room. Think of each potato as needing its own dance space.
4. Setting the Misting Schedule
My golden rule: mist for 5 to 10 seconds every 5 to 10 minutes. Enough to keep roots happy, not drenched.
One time, I over-misted. The tubers turned pale and waterlogged. Less is more with mist—it’s a gentle hug, not a bath.
5. Monitor and Maintain
Nutrients: Use a nutrient solution formulated specifically for root vegetables. Check the pH of the solution regularly and maintain it between 5.8 and 6.2 for optimal absorption. Replenish the solution every 1–2 weeks, as the potatoes will consume nutrients as they grow.
Light: Potatoes require at least 6–8 hours of light daily. If growing indoors, position LED or fluorescent grow lights about 12 inches above the plants. Adjust the lights as the plants grow to maintain consistent coverage.
Temperature: Maintain a steady temperature between 60–75°F (15–24°C). Avoid exposing the plants to extreme fluctuations or drafts. If growing indoors, use a temperature control system to regulate the environment.
Humidity: You need to ensure moderate humidity levels in the growing area to prevent dehydration of the roots and leaves.
6. Prune for Better Growth
The first time my aeroponic potatoes really took off, I was too impressed to intervene. The leaves were lush, the vines full of promise. I didn’t want to mess with success—until I noticed the mist wasn’t reaching the roots anymore.
Turns out, all that glorious green had grown into a canopy so dense, it blocked airflow and trapped moisture, creating the perfect playground for fungal problems.
I learned to be brave with the scissors. Now, I make a habit of gently pruning every week—removing yellowing leaves, thinning out crowded stems, and clipping back any overenthusiastic shoots. It’s like giving the plants room to breathe.
One time, I left a single system untouched for three extra weeks—just to compare. The pruned plants had more tubers, fewer issues, and looked visibly healthier. It was the proof I needed.
So don’t be shy—pruning isn’t punishment, it’s a kindness. It helps your potatoes put their energy where it matters most: into growing fat, flavorful tubers.
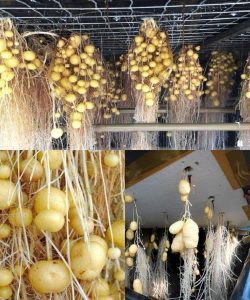
7. Harvest Your Potatoes
That Glorious Harvest Moment
You’ll know it’s time when the leaves start to yellow and flop. That’s your cue to check what’s been happening under the mist.
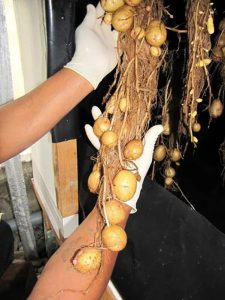
The first time I harvested, I pulled up a net pot and gasped. Plump little potatoes clung to the roots like ornaments. No dirt, no fuss. Just clean, perfect spuds ready for dinner.
- Gently lift the net pots.
- Let water drain.
- Pick the tubers off by hand—they practically drop into your palm.
It’s weirdly joyful. Like a potato treasure hunt.
Final Thoughts: When Potatoes Float, Anything Feels Possible
I never thought potatoes would be the thing that convinced me plants can grow midair. But here we are—mist swirling, roots dangling, and harvests that feel more like magic than gardening.
If you’ve got a curious heart and a spot for a little experiment, I say give it a go. Your future potatoes are already dreaming of floating.
Have questions or want to share your own misty success story? Drop a comment. I’d love to cheer you on. Let’s grow something beautifully unexpected.