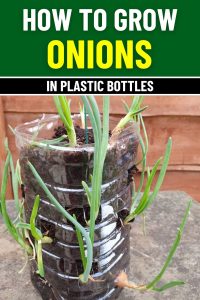
Grow Onions in Plastic Bottles: A Step-by-Step Guide to Sustainable Gardening
One day, I was slicing green onions for a noodle bowl when my daughter asked, “Why don’t we just grow these ourselves?” I looked at the cut-off roots in my hand and shrugged. That evening, I spotted an empty soda bottle in the recycling bin, and something clicked. By the next morning, we were poking holes in it, scooping in soil, and carefully planting tiny bulbs.
To our surprise, it worked. Shoots sprouted. We giggled every time one reached a little higher. It turned into more than just a gardening experiment—it became our little shared routine. Watering it together, checking the sun, watching those green stalks grow tall like little flags waving from a bottle. Something about that humble project made the kitchen feel more alive.
Whether you’re looking to teach kids where food comes from or simply want a low-maintenance way to grow fresh herbs at home, this method is a wonderful way to bring green into even the smallest corners of your life. Let’s dig in.
Why Grow Onions in Plastic Bottles?
Besides being a clever space-saver, growing onions in bottles is a small act of sustainability. It’s about turning something disposable into something living and useful. You also get:
- A compact, vertical garden that fits on any sunny windowsill
- Regular harvests of green onion shoots
- A neat way to keep soil contained and pests at bay
- The satisfaction of growing your own food in the smallest spaces
I shared this method with my neighbor Marian. She started hers on a narrow apartment ledge, and now she swears by it for her morning omelets.
Materials You’ll Need
To get started, gather the following items:
- A large, clear plastic bottle (2- or 3-liter soda bottles work well)
- Onion sets or small onion bulbs
- Potting soil or well-draining garden soil
- A sharp knife or scissors
- A small trowel or spoon
- Watering can or spray bottle
I used a recycled soda bottle and potting mix from last year’s herb garden—it worked perfectly.
Step-by-Step Guide to Growing Onions in Plastic Bottles
1. Prepare the Plastic Bottle
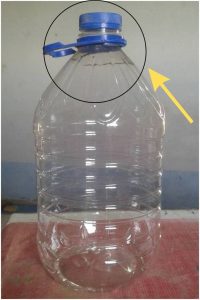
I usually do this outside or over the sink—it can get a little messy. Start by cleaning the bottle thoroughly, then:
- Cut off the top 2–3 inches.
- Cut holes spaced about 2 inches apart all around the bottle. Think of it like planting a spiral staircase of onions.
One friend who works in preschool said her students decorated the bottles with stickers and made it a fun classroom project. Every morning they checked whose onion had sprouted first.
2. Add Soil to the Bottle
Here’s where it starts to come together:
- Add soil to the bottom of the bottle.
- As you reach each set of holes, tuck an onion bulb in with its pointy tip facing out.
- Repeat—soil, bulbs, soil, bulbs—until you reach the top.
It’s like building a soil parfait. I once listened to a gardening podcast while doing it, and the time flew by.
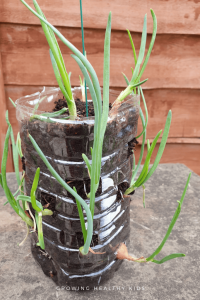
3. Don’t Forget the Top!
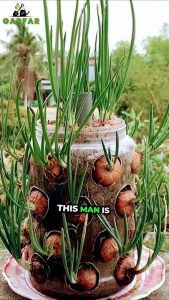
Once the bottle is filled with soil and bulbs on the sides, plant a few additional bulbs at the top of the bottle.
This maximizes your growing space and ensures you get a full, lush display of green onion shoots.
My aunt in Florida does only the top layer and calls it her “mini onion patch.” She swears they grow faster in warm light near the window.
4. Water Your Onions
Onions need consistent moisture to grow well. Using a watering can or spray bottle, water the soil thoroughly but avoid overwatering.
The soil should be moist but not soggy. Monitor the soil regularly and water as needed, especially if you’re growing onions indoors where the air may be drier.
During a dry winter, I added a small bowl of water nearby to help maintain humidity. You could also place the bottle on a plate to catch any drainage.
5. Place in a Sunny Location
Onions thrive in sunlight, so place your bottle in a sunny spot like a windowsill, balcony, or patio where it can receive at least 6-8 hours of sunlight daily.
If sunlight is limited, you can use grow lights to ensure the onions receive adequate light.
6. Monitor Growth and Care
Within a few days to a week, you’ll start seeing green shoots sprouting from the onion bulbs. Continue watering as needed and ensure the bottle is placed in a well-ventilated area to prevent mold or mildew.
For optimal growth, you can feed your onions with a diluted liquid fertilizer every two weeks. This will provide the nutrients they need to produce lush green shoots.
7. Harvest Your Green Onions
When the shoots reach a height of 6-8 inches, you can begin harvesting. Use scissors to snip off the green tops, leaving about an inch of growth above the bulb.
The bulbs will continue to produce new shoots, allowing you to enjoy multiple harvests from the same setup.
You’ll get multiple harvests before the bulbs are spent. I often cut mine just before dinner and stir them right into soups, eggs, or buttered toast.
Tips for Success
- Rotate the Bottle: Turn the bottle occasionally to ensure all sides receive equal sunlight, promoting even growth.
- Use Small Onion Bulbs: Smaller bulbs tend to fit better into the bottle holes and produce more manageable shoots.
- Reuse the Setup: After the bulbs stop producing, replace them with new ones and start the process over.
Final Thoughts: A Bottle Full of Green, and Joy
This isn’t just about growing onions. It’s about watching something thrive where nothing did before. It’s about finding joy in tiny rituals—in misting soil, in waiting for green, in snipping something you grew yourself.
So whether you live in a cabin, a dorm, or a high-rise, try it. Give an old bottle a new life. Let it sit in your window like a quiet little garden whisper, growing, greening, and reminding you that simple things still matter.
Have a bottle garden story or photo? Share it with me—I’d love to see how your windowsill grows.