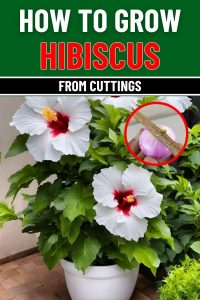
Guide to Growing Hibiscus Plants from Cuttings Successfully
There’s something about hibiscus that instantly transports me. Maybe it’s their bold, tropical color—like a sunrise tucked inside a bloom. Or maybe it’s because the first one I ever grew came from a single stem snipped in secret from my grandmother’s hedge.
I remember sneaking it into a glass of water on my bedroom windowsill when I was fifteen. I didn’t know anything about propagation. I just knew I wanted one of those blooms in my life. It didn’t survive, of course—I had no idea what I was doing. But I never forgot how much hope that little cutting held.
Now I have my garden, holding a healthy hibiscus branch and remembering that teenage version of me. This time, I had more knowledge. And even better, I had onions. Yes, onions! The same kind you’ve probably got sitting in your kitchen right now.
Let me walk you through how I grow hibiscus from cuttings—with a few humble tools, a little love, and the joy of watching something beautiful take root.
Why Grow Hibiscus from Cuttings?
Let me tell you something I wish I knew earlier: seeds can be slow, unpredictable, and often don’t grow into the exact plant you fell in love with.
But a cutting? It’s like a living bookmark. You get the same color, shape, and personality of the original plant.
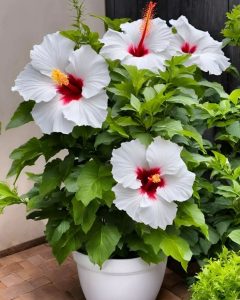
One summer, I spotted a bright red hibiscus outside a tiny bakery in a beach town. The blooms were the size of dessert plates. The owner noticed me swooning, smiled, and handed me a 6-inch snip. “Try it,” she said. “It’s friendlier than it looks.”
That little cutting now blooms by my fence every summer—and every time I see it, I remember that trip.
My Secret: Using Onion as a Rooting Hormone
I’ll admit, I was skeptical. I first heard about this from an elderly gardener in my local seed swap group. She told me onions were packed with natural auxins and antimicrobial benefits that help prevent rot.
So I tried it—half expecting a moldy mess. But guess what? The onion-treated cuttings rooted faster than the ones I dipped in store-bought hormone.
It felt like kitchen magic. And it made me realize: sometimes, the simplest things are the most powerful.
Choosing the Right Hibiscus Cuttings
Here’s what I do:
-
Pick a semi-hardwood stem: not too green, not too woody. Somewhere in-between is perfect.
-
6 to 8 inches long is my sweet spot.
-
I always look for 3 to 4 nodes (those bumps where leaves grow).
-
Then, I remove the bottom leaves—leaving just two or three at the top.
Once, I got overconfident and took a flowering stem because I couldn’t resist the beauty. It didn’t root. Lesson learned: blooms look pretty, but they drain energy. Pick a non-flowering stem if you want roots, not regrets.
How to Use Onion for Rooting Hibiscus Cuttings
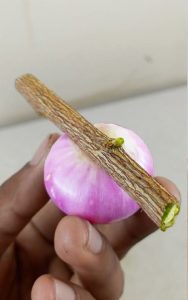
Step 1: Prepare the Onion
I start by selecting a fresh, medium-sized onion. The key is to choose one that’s firm and full of juice, as this will provide the most nutrients for the cutting.
Next, I cut the onion in half and make a small hole in the center. The hole should be just big enough to hold the hibiscus cutting securely.
Step 2: Insert the Cutting
I take my prepared hibiscus cutting and gently insert the bottom end into the hole in the onion. The juices from the onion coat the stem, providing the natural auxins and antimicrobial benefits that will help it root successfully.
Step 3: Planting the Cutting
Once the cutting is coated with onion juice, I plant it directly into a pot filled with well-draining soil. A mix of coconut coir, perlite, and compost works well for me. If you’re planting multiple cuttings, make sure to space them at least a few inches apart to give them room to grow.
After planting, I water the soil lightly and place the pot in a warm, shaded area. Bright, indirect light is best—too much sun can dry out the cutting before it has a chance to root.
Caring for Hibiscus Cuttings After Planting
The first few weeks are like tending a newborn. You don’t need fancy tools—just attention and patience.
Here’s what I do:
-
Keep the soil moist, not wet. I use my finger to check. If it feels dry an inch down, I water.
-
Trap humidity by covering it with a clear plastic bag (loosely) or using a mini greenhouse.
-
Place it somewhere warm and bright, but not sunny.
Once, during a heatwave, I moved mine to the laundry room. No direct sun, but plenty of warmth—and it rooted like a dream.
Transplanting Your New Hibiscus Plant
Once your cutting feels rooted and shows new growth (usually around 6–8 weeks), it’s ready for a bigger home.
Here’s my process:
-
Hardening off: I place it outside in the shade for a few hours a day, gradually increasing time.
-
Find a sunny spot. Hibiscus LOVES light.
-
Use rich, well-draining soil and a pot with drainage.
-
Water deeply, then let the top inch dry before watering again.
One time, I planted too soon in full sun. The poor thing wilted within hours. Shade first, then sun—it’s like letting your plant dip its toes before diving in.
Final Thoughts: What Growing a Cutting Really Means
There’s something incredibly special about watching a branch turn into a blooming bush. You feel like you’ve taken part in a quiet miracle.
That first flower? It feels like applause. Like your plant is saying, “You did it. I’m home.”
So don’t overthink it. Find a stem. Grab an onion. Plant with love and a bit of dirt under your nails. And then wait. Because in a few weeks, you’ll be staring at leaves that weren’t there before—signs of life, promise, and persistence.
Have you ever grown something from a cutting? Or do you have a hibiscus in your life that holds a special memory? I’d love to hear your story. Let’s trade garden tales in the comments. 🌿
![]()