The Do’s and Don’ts for Growing Orchids Healthy and Happy
I once tossed a blooming orchid straight into the trash. Yes—trash. The flowers had fallen off, the stem turned brown, and I thought, “Well, that’s it. Another plant I couldn’t keep alive.” It wasn’t even in the compost bin. I was that convinced it was done for.
But an hour later—out of sheer guilt—I pulled it back out. I rinsed the dust off the leaves, repotted it (poorly), and stuck it near a window out of pity. I forgot about it for weeks. Then one day, I noticed a tiny green nub pushing out from the base of the stem. That’s when I realized: I had no idea how orchids actually worked.
That one rescued plant sent me down a rabbit hole of learning, experimenting, and falling completely in love with orchids. I’ve since grown dozens, killed a few, saved a few more, and learned that most people don’t fail with orchids because they’re bad at plant care—they just haven’t been told the right way to care for these mysterious beauties.
So let me share what’s worked for me over the years—the tips, mistakes, and quiet discoveries that helped me go from accidental orchid assassin to confident grower.
Do’s for Growing Healthy Orchids
1. Choose the Right Orchid for Your Space
I’ve learned the hard way that not all orchids are created equal. My early attempts with Cattleya and Vanda varieties were a bit ambitious. For most beginners (myself included at the time), Phalaenopsis, or the moth orchid, is perfect. It’s forgiving, it blooms for months, and it doesn’t mind being on a windowsill.
Now, I keep a few in different rooms—one in the kitchen that gets morning light, another in the bedroom near filtered sunshine. They’ve adapted beautifully, and they never fail to impress visitors.
My tip: Start with one type and learn its needs before branching out. Each orchid has its own personality.
2. Provide Bright, Indirect Light
One summer, I placed an orchid in full afternoon sun thinking it would soak up the rays like a tomato plant. Instead, the leaves burned and the plant sulked for weeks.
Orchids like light—but not harsh light. Think dappled sunlight under a tree, not a beach vacation.
What works:
-
Place them near an east-facing window
-
Use sheer curtains if the sun is strong
-
Avoid direct afternoon rays—especially in summer
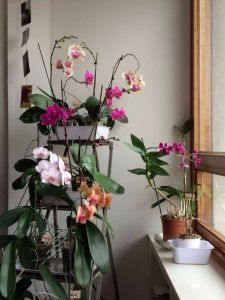
A happy orchid leaf should be medium green—not too dark, not too yellow.
3. Water Wisely
Watering used to terrify me. I either drowned or forgot them. Eventually, I learned to check the roots. When they’re silvery-white and dry, it’s time. When they’re green and plump, leave them alone.
Now I water about once a week, letting water run through the pot and drain completely. No soggy bottoms here.
What I do now:
-
Use room-temperature water
-
Water in the sink, let it drain fully
-
Let the potting mix dry out between waterings
And no, those “ice cube” tricks don’t cut it—orchids deserve better.
4. Use the Right Potting Medium
One of my early mistakes was assuming all plants liked soil. Big mistake. Orchids are epiphytes, which means they grow on trees in nature—not in dirt.
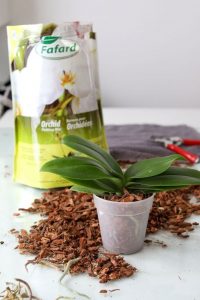
Now, I use a blend of bark chips, sphagnum moss, and a bit of perlite. It’s chunky, breathable, and helps the roots anchor in place just like in the wild.
My orchid mix includes:
-
Medium orchid bark
-
A little sphagnum moss (especially for moisture-loving types)
-
Perlite or charcoal for extra drainage
5. Maintain Proper Humidity
Dry air is one of the biggest hurdles for indoor orchid care. During winter, especially, the heat dries everything out. That’s when I noticed the leaf tips turning crispy and the blooms dropping early.
These days, I place my orchids on trays filled with pebbles and water. I group them with other plants, and I’ve added a small humidifier in the room.
Humidity tips:
-
Keep it around 50–70%
-
Use pebble trays with water (not touching the pot base)
-
A room humidifier is worth it for bigger collections
6. Prune and Maintain After Blooming
I used to assume that once the flowers faded, the plant was done. But no—this is just its rest phase. After a bloom cycle, I trim the flower spike just above a visible node.
Sometimes, the plant will rebloom from that spot. Sometimes it won’t. Either way, it’s resting, not quitting.
Don’ts for Growing Orchids
1. Don’t Use Regular Potting Soil
It bears repeating because I see it so often. Orchids in regular soil? That’s a recipe for root rot. Dense soil suffocates those airy roots.
Stick with an orchid mix—it feels strange at first, but it works.
2. Don’t Expose Them to Drafts or Heat Blasts
One winter, I put an orchid on the windowsill—right above the radiator. Within a week, the buds fell off. Lesson learned.
What to avoid:
-
Air conditioners
-
Heaters or heat vents
-
Drafty doors and windows
Stable temperatures = happy orchids. Aim for 65–75°F (18–24°C) by day and a slight drop at night.
3. Don’t Overfertilize (Less Is More)
I once tried to “boost” a stubborn orchid with weekly fertilizer. It didn’t bloom—it withered. Overfeeding stresses orchids and causes salt build-up in the roots.
Now I use a diluted, balanced orchid fertilizer once or twice a month—only when it’s actively growing.
Fertilizer tips:
-
Use a balanced 20-20-20 mix
-
Dilute to half or quarter strength
-
Feed during spring/summer, slow down in fall/winter
4. Don’t Forget About Airflow
Orchids in still air get cranky. I learned this after noticing mold on one of my pots. It’s not about blasting a fan—it’s about soft, constant movement.
Now, I crack a nearby window on nice days, and I run a small fan on low to keep the air fresh.
5. Don’t Repot Just Because
Repotting orchids too often is like rearranging your furniture every week—it just stresses everyone out. I only repot when the potting medium has broken down or the plant has clearly outgrown its pot.
Every 1–2 years is plenty. And when I do repot, I make it an event—new bark, a good soak, and a fresh start.
Final Thoughts: Orchids Are Teachers
Orchids taught me to slow down. They bloom in their own time, ask for what they need in quiet ways, and reward patience with some of the most stunning flowers I’ve ever seen.
They’re not impossible. They’re just different.
And once you tune in to their rhythm, you’ll find yourself falling for them too.
Got an orchid story? A favorite variety you swear by? Leave me a note in the comments or tag me in your blooming moments. Let’s keep learning, sharing, and celebrating the quiet joy these plants bring into our lives.

