Step-by-Step Guide on Growing Hydrangeas Trees for Gorgeous Blooms
The morning air was cool, almost heavy with the sweet scent of damp earth. As I wandered down a winding path at a small countryside plant fair, something caught my eye — a sight so quietly magnificent that I stood frozen for a moment longer than I’d admit. A small tree, no taller than my shoulders, was crowned with the biggest, fluffiest white blooms I’d ever seen. It looked almost otherworldly, like a garden secret only the lucky few ever stumbled upon.
That day, I didn’t go home with rare orchids or expensive perennials like I’d planned. Instead, I left cradling a young hydrangea tree, barely more than a sturdy stick with a few green leaves. I had no real idea how to care for it, no expert advice scribbled on a tag. Just a little surge of hope, a messy garden bed waiting back home, and a stubborn heart that whispered, “You’ll figure it out.”
Years later, that tree stands tall in the corner of my garden — a living memory of how magic sometimes grows from impulse decisions and a bit of patient love. Along the way, I made mistakes, learned tricks, and gathered wisdom from old gardeners who kindly shared their secrets. Today, I’ll pass that along to you. Let’s grow your dream hydrangea tree together.
Why Hydrangea Trees Feel Like a Little Miracle?
Growing a hydrangea tree feels like welcoming a living sculpture into your backyard. Unlike the round, bushy hydrangeas everyone knows, hydrangea trees — often called “standard” hydrangeas — stand proudly on a single trunk, their blooms billowing above like fluffy parasols.
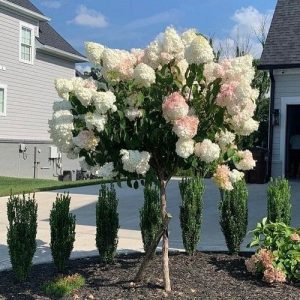
Depending on the variety, these beauties can grow from 3 to 12 feet tall, creating a show-stopping centerpiece for any garden. Their ability to stretch upward instead of sprawling outward gives a fresh, elegant structure that other shrubs just can’t mimic. More than once, visitors have wandered straight past my roses, lilies, and fancy herbs just to gasp at that hydrangea tree glowing in the sun.
If you’ve ever wished for a plant that feels equal parts magical and manageable, this is it.
Step 1: Choosing the Right Variety
Not every hydrangea will happily become a tree. Some varieties are naturally better suited for training into that gorgeous upright form — and picking the right one early will save you heartbreak later. Here’s what I’ve learned through both research and a few stubborn, failed experiments:
- Hydrangea paniculata (Panicle Hydrangea): These hydrangeas are hardy and thrive in a variety of climates. They produce cone-shaped flowers that are white initially and turn pink or red as they age.
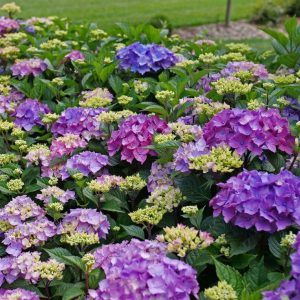
- Hydrangea macrophylla (Bigleaf Hydrangea): Known for their large, rounded flowers that bloom in vibrant blues, pinks, or purples, depending on the soil pH. These require slightly more care to maintain their health, especially in colder climates.
- Hydrangea arborescens (Smooth Hydrangea): A more compact variety, known for its white, fluffy blooms. This variety is very hardy and adapts well to various growing conditions.
Personal Tip: I chose ‘Limelight’ panicle hydrangea for my tree because it’s sturdy, forgiving, and practically begs to bloom — even when I forget to pamper it. If you’re unsure, Panicle varieties are a safe bet for beginners and seasoned gardeners alike.
Step 2: Choosing the Perfect Spot
The place you plant your hydrangea tree will shape its entire life — much like choosing where to build a house. Pick thoughtfully, and your tree will thank you with blooms so large they seem to float on air.
Here’s the sweet spot you want:
-
Sunlight: Morning sun with afternoon shade is perfect. Direct, punishing afternoon heat can scorch leaves and fade blossoms faster than you can say “wilting disaster.”
-
Soil: Well-drained but rich with life. Hydrangeas despise standing water around their roots, but they adore moisture that lingers in soft, loamy soil.
-
Shelter: A spot shielded from harsh winds keeps those heavy flower heads from snapping or drooping.
One year, I stubbornly planted a hydrangea tree right next to a south-facing brick wall, thinking the radiant warmth would help it grow. Instead, the poor thing crisped like toast every afternoon. Lesson learned: Afternoon shade isn’t a suggestion — it’s survival.
Soil Rescue Tip: If you’re stuck with clay or stubborn soil, work in heaps of compost or aged manure before planting. I like to imagine it as cooking a “first feast” for the baby tree — a rich banquet that invites deep, healthy roots to settle in and stay a while.
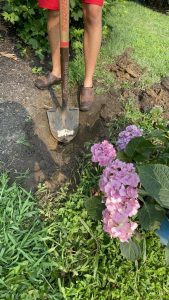
Step 3: Planting Your Hydrangea Tree
Planting a hydrangea tree feels a bit like tucking in a child on their first night in a new home. It’s a small moment packed with quiet hope and so much care. Every gardener I know — from beginners to old-timers — agrees that getting this step right makes all the difference between a thriving beauty and a struggling sapling.
Here’s how to give your hydrangea tree the best start:
- Dig the Hole: Make the hole at least twice the size of the root ball of the hydrangea tree. The depth should match the root ball’s size so that the tree sits at the same level as it did in the pot.
- Soil Preparation: Mix compost or organic matter with the existing soil. This will enrich the soil, providing the nutrients your hydrangea tree needs to grow strong and healthy.
- Place the Tree: Gently remove the tree from its container and place it into the hole. Ensure that the root ball is level with the surrounding soil. Fill the hole back up with soil and gently firm it around the roots to eliminate air pockets.
- Water Thoroughly: Once planted, water the hydrangea deeply. Hydrangeas like moisture, so ensure the soil is evenly moist but not soggy.
I used to rush through planting in my early gardening days, eager to “get it done.” My first hydrangea tree taught me otherwise — it leaned to one side for an entire season because I hadn’t taken a minute to check its posture. Now, I plant slowly, like building something sacred.
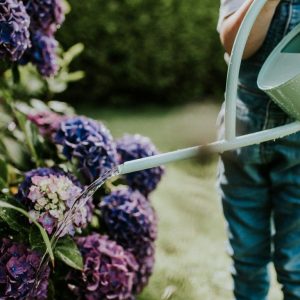
Step 4: Care and Maintenance
Living with a hydrangea tree is a bit like being in a relationship — give it attention, respect its needs, and it will reward you with breathtaking displays year after year. Here’s what keeps my own hydrangea tree strong, even through storms, droughts, and toddler soccer balls flying through the garden:
Watering Wisdom:
-
Water deeply once or twice a week, adjusting depending on rain. Shallow sprinkling doesn’t cut it. I stick my finger about two inches into the soil — if it’s dry, it’s time to water.
-
Mulch with 2-3 inches of bark or straw to lock in moisture and keep roots cool.
Pruning with Purpose:
-
Prune right after the tree finishes blooming, typically late summer into fall.
-
Trim dead wood, thin out crowded branches, and shape the canopy to encourage air circulation and future flower buds.
Feeding Gently:
-
Feed once in early spring with a slow-release, balanced fertilizer (10-10-10 works wonders).
-
Skip the temptation to over-fertilize — too much nitrogen will grow gorgeous leaves but very few blooms.
Every March, I scatter crushed eggshells around the base of my hydrangea tree. It’s an old gardener’s secret for a calcium boost — simple, natural, and it feels oddly magical to do something so small that makes such a visible difference.
Step 5: Preventing Common Problems
Even the best-loved gardens face rough patches. Hydrangea trees aren’t fragile, but a few bumps in the road are common. Knowing what to watch for can save you heartache (and save your tree).
Leaf Spot: Tiny dark specks that grow into ugly splotches. It’s usually harmless but unsightly. Keep the leaves dry by watering at the base and remove any affected foliage quickly.
Aphids: Little green vampires that suck life from tender new leaves. I blast them off with the hose in the morning when the sun isn’t too harsh, or spray a gentle solution of dish soap and water.
Powdery Mildew: A ghostly white dust that can coat leaves in humid weather. Improve airflow around the tree, and apply a neem oil spray if it gets out of hand.
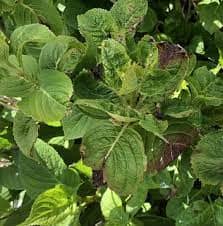
Friendly Reminder: When troubles appear, don’t panic. Most issues won’t kill your hydrangea if caught early. Gardens, like life, aren’t about perfection — they’re about persistence.
Step 6: Enjoy the Beautiful Blooms
One summer afternoon, I sat on a bench near my hydrangea tree, barely noticing the time slipping away. The low sun gilded every petal in a buttery gold light, and the whole tree seemed to glow. Neighbors walking by slowed their steps to take a second glance. In that stillness, I felt something shift — pride, wonder, maybe even a bit of quiet triumph.
That’s the gift a hydrangea tree gives you.
Not just beautiful flowers, but memories etched into ordinary days. Your tree will bloom differently every year — some years lighter, some years explosively abundant — but every season, it will whisper back to you, “You built this beauty with your own hands.”
Final Thoughts
Every time I pass my hydrangea tree, I find a new reason to smile — a fresh bud, a playful butterfly hovering nearby, a neighbor’s whispered compliment. It has become more than a plant; it’s a living memory rooted in hope, patience, and simple joys.
Starting your own hydrangea tree journey might feel daunting at first. But trust me, what you plant today will bloom into a legacy tomorrow — one filled with awe, gratitude, and countless beautiful surprises. So go ahead. Choose your tree. Find that sunny-shady corner. Plant your dream, water your hope, and wait for the magic to unfold.