Step-by-step Guide on Growing Tulips in Water Successfully
One chilly morning, I noticed my windowsill looked especially bare. I craved a pop of color, something fresh and delicate to soften the winter stillness inside my home. That’s when I reached for a few tulip bulbs I had tucked away and decided to try something I hadn’t done in a while—grow them in water.
It felt almost magical watching those dry, quiet bulbs slowly send out roots, then shoots, and eventually unfurl into soft, elegant blooms. No soil. No digging. Just a glass vase, some patience, and the quiet wonder of nature doing its thing right in my kitchen.
This method doesn’t ask for much. A little planning, a bit of prep, and some gentle tending. Let me show you how you can enjoy tulips blooming indoors—even when your garden is still sleeping.
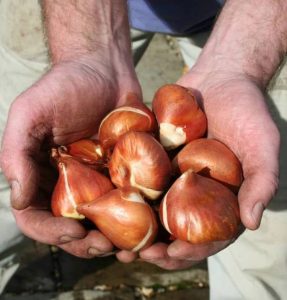
Step 1: Choose Healthy Tulip Bulbs
You should choose large, firm, and healthy bulbs without any signs of mold, soft spots, or damage. Look for bulbs labeled as “pre-chilled” or “ready for forcing,” as these have already gone through the cold period needed to trigger blooming.
If you can’t find pre-chilled bulbs, you can chill them yourself. Simply place them in a paper bag and store them in the refrigerator for 10-14 weeks at temperatures between 35–45°F (2–7°C). Avoid storing them near fruits like apples, which release ethylene gas that can harm the bulbs.
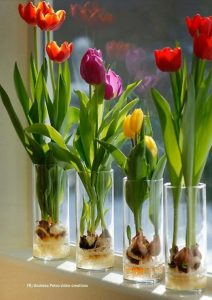
Step 2: Prepare a Vase or Container
Tulips grown in water need a container that supports the bulb and allows the roots to grow in water. A narrow-neck vase or a bulb vase works perfectly, as the neck holds the bulb above the water while the roots grow below.
If you don’t have a bulb vase, a regular glass jar can work. To support the bulb, you can add decorative stones, marbles, or pebbles to the bottom of the jar.
Step 3: Fill the Vase with Water
Add clean water to the vase or container, filling it just below the base of the bulb. The water should only reach the bottom where the roots will form.
You should use distilled or filtered water to avoid any chemicals that might harm the growing roots. If you’re using tap water, let it sit for 24 hours to allow chlorine to evaporate.
Step 4: Place the Bulbs in the Vase
Gently place the tulip bulbs in the vase, ensuring the pointed end faces upward. The base of the bulb should sit just above the waterline, supported by the vase or pebbles.
Arrange the bulbs with enough space between them so they don’t touch each other, as overcrowding can lead to mold or rot.
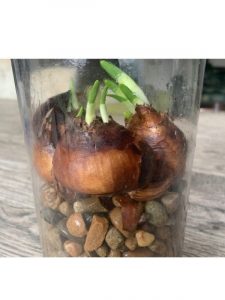
Step 5: Keep the Bulbs in a Cool, Dark Place
Once the bulbs are in place, the next step is to mimic winter conditions. Place the vase in a cool, dark location such as a basement, garage, or even a refrigerator for about 2-4 weeks. The temperature should stay between 40-50°F (4-10°C) to encourage root development.
Besides, you check the water level periodically during this time, ensuring it stays just below the bulb. Replace the water if it becomes cloudy.
Step 6: Move to Indirect Light for Growth
After the roots have grown 1-2 inches long and shoots begin to emerge from the bulb, it’s time to bring the vase into a brighter environment. Move it to a spot with bright, indirect sunlight, such as a windowsill.
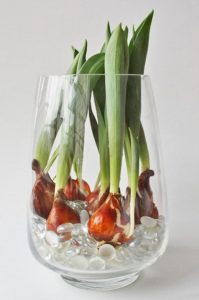
Step 7: Monitor and Maintain
Now that your tulips are actively growing, keep an eye on their progress. Change the water every 5-7 days to keep it fresh and prevent bacterial growth.
As the flowers grow, you may need to rotate the vase every few days to ensure even growth and prevent the stems from leaning toward the light source.
Step 8: Enjoy the Blooms
Tulips grown in water typically bloom within 4-6 weeks after being moved to light. The exact timing depends on the variety and growing conditions.
Tulips grown in water last for about 1-2 weeks in bloom. To extend their life, keep the vase in a cool room and away from heat sources like radiators or direct sunlight.
Step 9: Discard or Compost the Bulbs
Unfortunately, tulip bulbs grown in water don’t store enough energy to bloom again. After the flowers fade, it’s best to discard the bulbs or compost them. If you’re looking to grow tulips again, start fresh with new bulbs next season.
Final Thoughts
If you’re like me and long for color during colder months, this is a simple, soul-soothing project worth trying. It just needs a bit of care and a clear vase by the window.
Let your bulbs bloom where you can see them every day, and let the joy they bring be a gentle reminder that spring can live inside your home, too.
Take what you’ve learned here and give it a try. And if your first attempt doesn’t go perfectly, that’s okay—gardening always makes room for second chances.