Full Guide on Planting Ginger in Pots Successfully
It started with a mug of ginger tea on a rainy afternoon. I remember the way the steam curled into the kitchen window, carrying that spicy-sweet scent I’ve always associated with warmth and calm. I had no intention of becoming a ginger grower—only a craving for something cozy. But that little knobby root I’d sliced for my tea had a green eye peeking from one end. It looked… alive.
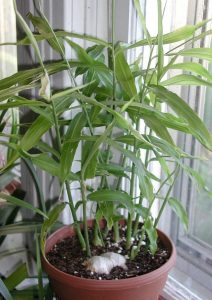
Curious, I tucked it into a half-filled pot that had once held basil. I didn’t think much would happen. But a few weeks later, tiny shoots pushed through the soil like shy fingers stretching toward light. That was my first ginger plant. Since then, I’ve grown pots of it on sunny windowsills, back patios, and even under a porch roof during the rainy season. It’s become a favorite not just because of how easy it is—but because every time I harvest a piece, it feels like opening a fragrant secret.
If you’ve never tried growing ginger in pots, I’d love to walk you through it. You don’t need much—just a few basics, a little care, and some patience. And in return, you’ll get fresh ginger that tastes better than anything from a grocery store.
1. Choose a Wide, Deep Pot for Root Expansion
Ginger grows outward, not downward. Its rhizomes like to sprawl beneath the soil, forming knotted arms and tubers in every direction. So when picking a pot, go wide rather than tall—something at least 12 inches deep and as wide as you can manage.
I use a recycled clay basin from an old flower display. Whatever you use, make sure it has proper drainage holes. Ginger hates soggy feet. A waterlogged pot is a quick road to rot, so let the excess escape freely.
Tip: If your container has no holes, drill them in or line the bottom with chunky gravel under the soil to create space for drainage.
2. Start With a Healthy Ginger Rhizome (And a Bit of Faith)
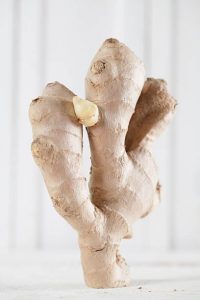
Your success begins with what you plant. Grocery store ginger can work fine—just choose a fresh piece that’s plump, beige, and not shriveled. Look for little “eyes”—they look like tiny nubs or horns—and try to find one with several.
I once scored a beautiful root at the local farmers’ market, and I still remember how it scented the whole kitchen the moment I sliced it. You can cut larger rhizomes into smaller sections, just make sure each piece has at least one or two eyes.
My habit: Soak the ginger in warm water overnight before planting to help wake it up, especially if it’s been refrigerated.
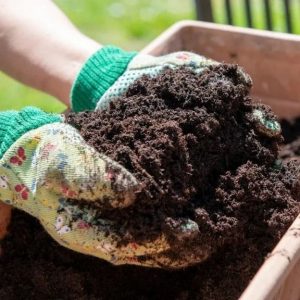
3. Prepare Loose, Nutrient-Rich Soil
Ginger prefers fluffy, fertile soil that drains well. Think light and airy, not dense and muddy. I mix potting soil with compost and a small scoop of sand or perlite for better aeration. It’s like giving the roots room to breathe and grow comfortably.
The ideal pH is slightly acidic—around 5.5 to 6.5—but I rarely test unless I’m starting a brand-new batch. As long as the soil is rich and drains well, ginger will usually be happy.
Note: If your mix feels heavy, stir in some coconut coir or vermiculite. Your fingers should move through the soil easily, like stirring a bowl of fluffy cake batter.
4. Planting Ginger: Small Burials, Big Rewards
I plant my ginger sections about 2 inches deep, with the buds facing upward. Think of it as tucking them into bed—snug, but not smothered. In a wider pot, I space them about 6 to 8 inches apart to allow room for spreading.
After planting, I water lightly and place the pot in a warm spot. Ginger thrives in warmth, ideally between 70–85°F (21–29°C). It doesn’t need bright sun—just consistent warmth and bright, indirect light.
I once kept a ginger pot beside the kitchen fridge just because it stayed warm there. It flourished like a little stove-side secret.

5. Watering and Humidity
Ginger loves moisture, but it’s important not to overwater it. I keep the soil consistently moist, but not soggy. In the hotter months, I water more frequently, but in the winter, I cut back to avoid root rot.
In my home, I increase humidity by misting the plant occasionally, or by placing the pot on a shallow tray filled with water and pebbles. This helps keep the air around the plant moist, which ginger loves.
If your home is dry, consider using a humidifier to mimic tropical conditions.
6. Feeding Your Ginger Plant
Ginger may be low-maintenance, but it appreciates a good meal—especially during its active growth from spring through early fall. I usually use a gentle liquid fertilizer once a month, preferably something organic and balanced. If I had to choose one key nutrient, it would be potassium. It helps the rhizomes plump up and develop that rich, spicy flavor.
During cooler months, when growth slows down, I cut feeding way back—maybe once every 6–8 weeks or not at all. Think of it as letting the plant rest after a busy season.
My go-to: A homemade compost tea or seaweed-based fertilizer works wonders. It’s mild, natural, and won’t overwhelm the soil.
7. Providing the Right Light
If you’ve ever scorched a plant’s leaves under a midday sunbeam, you know how unforgiving it can be. Ginger prefers dappled light—like what you’d find beneath a tree in the tropics. Indoors, I keep mine near a north-facing window or behind a sheer curtain on the east side of the house.
Outdoors, I place it under my grapevine trellis where it gets morning sun and afternoon shade. Too much direct light will brown the tips of its leaves and stunt its growth.
Visual cue: If the leaves are pale or curling, the plant’s getting too much light. Move it to a softer spot and watch it bounce back within a week.
8. Harvesting Ginger
Ginger takes its time. Around 8 to 10 months after planting, you’ll notice the plant beginning to yellow and die back. That’s your cue—harvest season is near. But you don’t have to wait for a full harvest. I sometimes dig around the edges gently and snip off a small piece while the rest continues to grow.
To harvest, I slide my hands into the soil and feel for firm rhizomes. I break off what I need and refill the space with fresh compost. The plant keeps going.
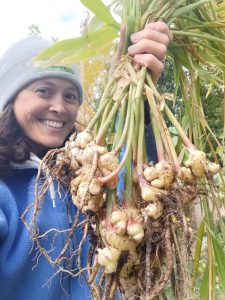
Harvest memory: The first time I pulled a golden piece from the pot, I was ridiculously proud. It smelled stronger and spicier than any store-bought root I’d ever used.
9. Keep Your Ginger Plant Healthy
Thankfully, ginger is a relatively trouble-free plant. That said, it’s still a good idea to check on your leaves every now and then. I’ve had occasional mealybugs and aphids, especially when I’ve kept plants too close together indoors.
If I catch anything early, a damp cloth or a gentle neem oil spray usually clears it up. The key is regular observation—just a quick glance while watering can help you catch problems before they spread.
My tip: Leaf tips turning yellow can also mean overwatering or poor drainage. Make sure your soil isn’t staying soggy, especially in colder months.
10. When and How to Repot Ginger
Like any plant that lives in a container, ginger eventually runs out of room. I usually repot mine every 2 to 3 years, or when I notice the rhizomes pressing against the sides of the pot. The roots begin to feel like a knotted rope ball—tight and crowded.
When repotting, I take the opportunity to divide the rhizomes and start new plants. It’s like refreshing a sourdough starter—you keep the best parts and pass a little on. Always use fresh soil when moving to a new pot.
Bonus: Giving someone a potted ginger cutting is a surprisingly lovely gift. Wrap it in brown paper and twine—it feels like a botanical treasure.